Wedding Photography Project

February 18, 2009

Radiopopper PX Review

I just got some new toys tools for wireless, off-camera flash called Radiopopper PX. What they basically do is take Canon wireless flash technology and make it useful somewhere besides in a dark room with the flashes pointed at each other. You then use the flash system on your flash to set up lighting ratios, manually change the flash settings, use automatic flash without having the light source coming from on top of your camera. Today I took my son and Sounders FC superfan, Kyler, to the park to play with the system.

I wanted to test a few things: the High Speed Sync, speed of operation, and a comparison of the eTTL system versus the manual flash adjustments that I usually do. I used a flash 580EX flash on my camera acting as the master unit with a Radiopopper PX transmitter attached to the top of it and two 550EX acting as slaves with the Radiopopper PX receivers attached.

This is what I envisioned when we went to the park.  I used the Radiopoppers to transmit the fire signal and the manual flash adjustments while keeping my shutter speed at the 1/200th top speed that the Canon 5D allows for traditional flash systems.

This is what I envisioned when we went to the park. I used the Radiopoppers to transmit the fire signal and the manual flash adjustments while keeping my shutter speed at the 1/200th top speed that the Canon 5D allows for traditional flash systems.

This image was taken using the high speed sync allowing for a much more shallow depth of field.

This image was taken using the high speed sync allowing for a much more shallow depth of field.

I really liked this image.  Ky loves soccer and is really excited for MLS to be coming to Seattle (Sounders FC season starts March 19).  For this I used the eTTL system rather than manually setting the flash and I was pleasantly surprised at the nicely exposed result.

I really liked this image. Ky loves soccer and is really excited for MLS to be coming to Seattle (Sounders FC season starts March 19). For this I used the eTTL system rather than manually setting the flash and I was pleasantly surprised at the nicely exposed result.

radiopopper-px-004

This is more what I expected from eTTL.  The camera saw the bright lightsource in the frame and didn't use enough flash power (even though the fired) to make a proper exposure.

This is more what I expected from eTTL. The camera saw the bright lightsource in the frame and didn't use enough flash power (even though the fired) to make a proper exposure.

In this image, I switched to manual flash exposure and I had a much better exposure.  This image is processed identically to the image before it so that it is an apples to apples comparison.

In this image, I switched to manual flash exposure and I had a much better exposure. This image is processed identically to the image before it so that it is an apples to apples comparison.

This image shows the shallow depth of field that is possible using high speed sync and a fast lens.

This image shows the shallow depth of field that is possible using high speed sync and a fast lens.

Same as the image before, but with the focus on his face rather than his hands.

Same as the image before, but with the focus on his face rather than his hands.

Another using the high speed sync to make him pop from the background.

Another using the high speed sync to make him pop from the background.

Testing the range.  I was about 150 feet away.  Really all that I need it to work at would be this range.  The system is supposed to work at 1700 feet.  Nice, but not necessary for me!

Testing the range. I was about 150 feet away. Really all that I need it to work at would be this range. The system is supposed to work at 1700 feet. Nice, but not necessary for me!

The front of his jersey.  This image was shot at 1/6400 of a second with a full power flash.

The front of his jersey. This image was shot at 1/6400 of a second with a full power flash.

This image of my amazingly handsome son was taken at f2 for the shallow depth.  Again using HSS.

This image of my amazingly handsome son was taken at f2 for the shallow depth. Again using HSS.

Again using the two flashes and HSS.  The shallow depth of field throws the trees and sky out of focus and makes them shapes rather than trees.

Again using the two flashes and HSS. The shallow depth of field throws the trees and sky out of focus and makes them shapes rather than trees.

These last three images are for illustration of the Manual versus eTTL.  The first is taken with manual flash, the second is eTTL.  The third is eTTL with +2 stops of exposure compensation.

These last three images are for illustration of the Manual versus eTTL. The first is taken with manual flash, the second is eTTL. The third is eTTL with +2 stops of exposure compensation.

radiopopper-px-016

radiopopper-px-017

My conclusions are that the Radiopopper PX system works really well for doing portraits. The system fired the flashes every time the flashes were ready and charged. It works well at distance. It provides a reliable system to use the HSS (high speed sync) allowing for flash and shallow depth of field at the same time. And it allows me to change my manual flash settings without going over to the flash and pushing buttons (I can push buttons from wherever I am with the camera).

Where it falls down in my mind is the difficult installation (you actually have to semi-permanently attach it to the flashes you are going to use rather than take it on and off at will) and the fact that it is limited to speed of operation of the Canon wireless flash system. I tested it on motor drive and was able to get only four out of 12 to fire at 1/128 power at three frames per second (frames 1, 2, 3, and 9 of the 12). This was because the Canon master flash was not ready, not because the Radiopoppers or the receiving flashes were not ready.

Finally, I found that I got the results that I wanted most consistently when I used manual flash exposure. The eTTL was right about 75% of the time, but for me being wrong 25% of the time doesn’t cut it.

It is a very cool time to be a photographer with all the awesome equipment available!

December 29, 2008

Top 100 Photography Blogs!

Filed under: Uncategorized — admin @ 10:18 am

I recently found out that the Wedding Photography Project has made a list of the top 100 photography blogs!  Check it out!

And a random photo…

Tony & Yeri wedding photo by the Bellevue Art Museum

November 20, 2008

A couple cool links

Filed under: photo techniques,wedding photography — Tags: , — admin @ 3:51 pm

The first one is Magnum Photographers and advice for starting out in photography.

The second is a photo organization that can help to promote your business.

photographik – the elite photographers network – features only the most talented wedding photographers in the United States and beyond.

April 3, 2008

Lightroom 2.0!

Filed under: Lightroom,Photoshop — admin @ 3:20 pm

wpp-lr1.jpg

Regular LR 1.3

wpp-lr2.jpg

LR 2.0 with selective area editing to make the sky darker and more saturated.

Very cool. Lightroom 2.0 is out in Beta. Download it!

Cash is king

Filed under: wedding business — admin @ 1:56 pm

cash.jpg

I was just on a forum reading about the unfortunate events that have happened to a photographer.  Basically, his airlines for a destination wedding went out of business.  He was out the airfare and the other options were for thousands of dollars that he didn’t have.  I completely feel for this guy, who is a real nice person and got stuck with a bill for thousands that he wasn’t expecting.  My issue, which is cold and callous, is that no one running a business should ever have so little cash on hand!

When I am consulting with photographers that are starting their businesses, I always recommend that they keep 6 months of all their expenses in the bank.  Not in stocks, bonds, real estate, or anything else that can make it inaccessible or could take a nose-dive in value.  You can call this your “rainy day” fund, or be more realistic like myself and call it your “Oh, crap I broke my hand and can’t hold a camera fund.”

Often, when I propose this idea,  I get the reaction that it would be hard or impossible to save that kind of money.  Followed by horrified reactions when I explain that a BMW is not a necessity.  Or that eating out is optional.  Or they try not drinking coffee at Starbucks and brewing their own at home.  So…stop buying cameras, lenses, monitors, computers, drive an old Kia, whatever it takes to get your rainy day fund so that you can afford to be in business on a bad day.

March 17, 2008

Blog of Photogs

Filed under: Uncategorized — admin @ 9:51 am

Great place to find sources of inspiration!  The Blog of Photogs.

wpp-blogphotogheader.jpg

March 5, 2008

Make Mine Extra Crispy!

Filed under: Lightroom,photo techniques,Photoshop,Photoshop techniques — admin @ 12:41 pm

Laurence Kim is a spectacular wedding photographer in Seattle. His images almost always feature perfect sharpness and it is a bit of a trademark of his. When I saw on his blog that he was giving away his secrets, I asked him if I could share them as well! You can see more of his images on his website and blog.

I get asked all the time – by professionals as well as amateurs – how I get my images to look so sharp – so clean and crispy. Well, there really is no secret (well, there’s one secret you’ll see in a minute). Getting that crisp look is a combination of several factors. I hope this brief explanation helps, let me know if it does!

(1) Make sure your image is properly exposed. In my opinion, this is probably the most important factor in getting a crisp image. Get in the habit of taking a quick test shot and look at your histogram. While the shape of the histogram will vary according to the lighting conditions, the one thing you want is for the shape go all the way to the right side of the chart, like this:


Now take a look at this histogram. You’ll clearly see the data does not go all the way to the edge of the histogram, it’s about one stop underexposed.


Yes, you can adjust the exposure slider in your image editing software of choice to stretch the chart to the right. You’ll need to do this to produce an acceptable image, but the drawback is that when you stretch the data to fix an underexposed image, it gets muddy. I’m not a techie so I can’t explain exactly why, but just do your best to get the exposure correct in the camera.

Since I usually shoot in aperture-priority mode, the way I do this is take a quick test shot, then look at the histogram. 90% of the time, if shooting indoors I’ll need to add some positive exposure compensation, often a full stop or more. If I’m shooting a bride in a white dress in a room with white walls I know for sure my default camera setting will be +1 exposure compensation. Don’t trust the image in your camera’s LCD! It will often look okay even if severely underexposed. Just trust the histogram. Lastly, don’t worry about blown-out highlights if they occur on non-critical areas of the frame (windows, light fixtures, etc.). It’s more important that your subject be properly exposed.

(2) Hold that camera steady! Camera shake is another enemy of sharp images. Find a technique that works for you. I form a little tripod with the camera pressed against my forehead and my two elbows anchored against my torso. Then I shift my feet so they are spread apart, with one foot in front of the other. Finally, I exhale then press the shutter. Try practicing by setting your shutter speed to a slow setting, like 1/15th, and see how many sharp images you can get.

It also helps a LOT if you have gear with image stabilization, either in the lens or in the camera body. Most professionals use either Canon or Nikon, which have lens-based IS, while Olympus, Sony and Pentax use in-body stabilization. In theory, lens-based IS is slightly superior. However, in reality many lenses – particularly prime lenses – don’t come with IS, making in-body IS superior in my opinion. Come on Canon, get with it!

(3) Speaking of lenses, get yourself some sharp ones! Lenses are more important to image sharpness than the camera body. What’s a sharp lens? While there are always exceptions, as a general rule primes are sharper than zooms, and zooms with large apertures (f2.8) are usually sharper than consumer-level zooms that start at f3.5 or smaller (the exception being the Canon L series f4 zooms, which are known to be pretty sharp).

You don’t have to spend a lot of money to get some really sharp lenses. Both Canon and Nikon have sharp prime lenses under $400. Sigma makes a great little 30mm f1.4 prime that’s super sharp for $389. Tamron makes a super sharp 28-75mm f2.8 zoom for $359 that some say is sharper than the Canon L-series equivalent that costs over $1,000. This little Canon 50mm f1.4 lens is the sharpest lens in my bag and it costs $289:


(4) Lightroom and Photoshop CS3 have a new slider called “clarity”. It adds some local contrast adjustments that make the image appear sharper. It’s right below the contrast slider. I move the clarity slider from 20-40 on every single image:


(5) Pre-sharpening. I go through 2 levels of sharpening on every image, one in Lightroom and then another in Photoshop. For my pre-sharpening, I use the lightroom defaults that you see here:


(6) Use large apertures to isolate your subject. This seems counter-intuitive, given that lenses are generally at their sharpest at f5.6 – f8. However, for most general shooting in a non-studio environment, shooting at a wide open aperture (say, f2.8 or wider) will blur the background so that the eyes will register the subject even sharper than it really is. In other words, the contrast between the subject and background is enhanced, making the subject pop out of the screen. In this example, I’m focusing on the leaf at f2.5 with a Canon 85mm f1.8 lens. The leaf isn’t really that sharp when viewed at 100% – it is slightly out of focus. However, since the rest of the image is blurred from the wide aperture, it appears really crisp:

Laurence Kim Photography - Seattle Wedding Photographer

(7) Of course, there’s the importance of proper sharpening in Photoshop. Don’t be afraid to sharpen! DSLRs come with an anti-aliasing filter that’s used to smooth out jagged edges that might otherwise make your image look pixilated. The AA filter blurs the image, so some degree of sharpening is needed to bring it back to normal. I’m not bashful when it comes to sharpening. Even if it looks slightly over-sharpened on a computer screen, I know it will print beautifully. Okay, here’s the secret I told you was coming: I use Kevin Kubota’s “Magic Sharp” sharpening action on every single image. I’ve tried virtually every method there is to sharpen over the years and in my opinion this is THE best method. I can’t tell you what the formula is because that would be unfair to Kevin. Just go to his website and buy it! It is in his Production Tools Volume 1 and costs only $69. I would have paid 100x that amount just to get this sharpening action since it makes such a huge difference in my images.

I hope this post was helpful. Follow the 7 steps and I’m sure you’ll achieve your quest to find the elusive extra crispy look:


Laurence Kim Photography - Seattle Wedding Photographer


One last thing to think about here. Please don’t get hung-up on image sharpness. I think it was Henri Cartier-Bresson who said that image sharpness was highly overrated. This image – taken by my second shooter Kip Beelman – was used as a full-page spread in one of my albums. It was taken in a dark room at a slow shutter speed and definitely has motion blur. It also has a lot of high ISO noise so it’s anything but crisp. However, I still think it’s a great image. I’ll take a shot that conveys a touching moment over a boring crispy shot any day!


Laurence Kim Photography - Seattle Wedding Photographer

February 25, 2008

The Boda Bag

Filed under: Boda — admin @ 5:59 pm

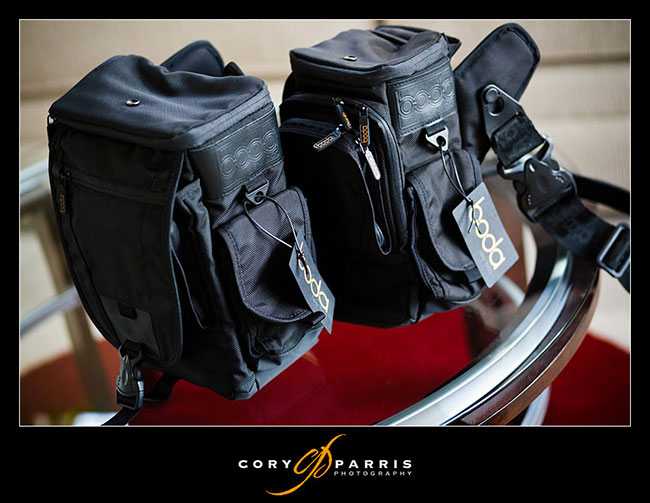
It is really cool that one of my favorite products is made by a friend of mine. I love my Boda Bag and my friend Jim Garner just sent over the newest copies of them. The Boda Dry and the Boda Dry Jr. Keeping with the original bag, they are the most comfortable I have ever had with me. They are designed to be used when shooting as opposed to transporting your gear. Because of the more specialized intended use, they fit the needs of a busy wedding or portrait photographer better than any other bag I’ve use.

boda-1.jpg

The new thing about these bags is that they are waterproof and will protect your gear in a rainstorm. This makes sense for me and Jim that are from the home of liquid sunshine here in Seattle. Also, he came out with a new, smaller size for someone wanted to carry one large or a couple smaller lenses stacked. Very cool. I see myself taking that one on vacation more than shooting because I shoot primes and switch out my lenses fairly often.

boda-21.jpg

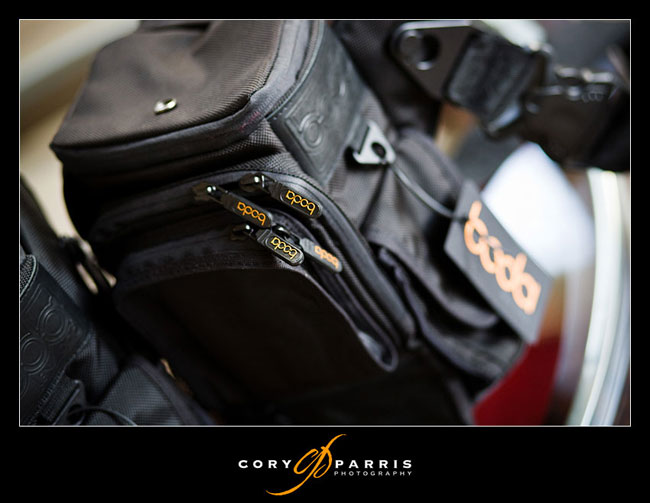
One more thought on the Boda is that Jim has done a great job of branding the bag. A couple of the photos I took were specifically to show off the number of times it says Boda on this thing. I counted 10 on the outside not counting the strap and the interior which say Boda repeatedly! Nice marketing!

boda-3.jpg

February 16, 2008

The Power of Model Shoots by David Beckstead

The Power Of Bridal-Model Shoots!
My first model shoot was after my first destination wedding in Italy. The wedding couple did not want to be involved with a “Day After’ style shoot. The wedding day was all the imagery they wanted. I was a little disappointed. I had the perfect opportunity to expand my imagery base and use the wonderful Italian architecture to my advantage and give the couple some creative art. The wedding ceremony was at an old Italian church yet all other architecture around the wedding festivities had a modern feel to it. So I asked my wife (who is my shooting partner) to model at Lake Como in the North of Italy. We bought a dress and I shot for hours. These images I used to enhance my destination wedding business. This was the start of a new passion: Bridal-model shoots!

model-article-1.jpg

By bridal-model photography I mean models in bride dresses and occasionally a male model in a groom style outfit. Why? My branding. I am a pro wedding photographer: every image I take is meant to enhance my brand to my prospective clients and to photographers. Every strong model image is useful to me in many ways.
Here are some ways:
1. An outlet to bring out compositional concepts not always easy to accomplish at weddings.

2. Improving compositions, style and your art.

3. Creating imagery for marketing and branding.

4. Creating value and increasing your worth.

5. Giving you a reason to see the world.

Many times I catch myself wishing the bride created more opportunity and time for me to really shine and pull compositional concepts out of my head and onto digital. Often the pressures of the wedding day keep eroding the time they said they would give me with the two of them alone. Timetables get pushed back and ‘your’ time with the b&g gets taken away. You go home a little frustrated that you could not create some of the art you intended to. Of course you shoot an amazing wedding for your clients but there is always artistic ideas you wanted to give to the bride and groom and more importantly, give to yourself. Let’s admit it, you are always looking for that perfect opportunity at wedding shoots to find and make a fantastic image you can use for your website, print competition and marketing.
Model shoots will give you this time (your time!) to flush out compositional ideas and concepts. These kinds of shoots will help improve your composition (what you decide to include and eliminate in your cameras viewfinder) more than you realize. It ‘feels’ easier to ‘Step Outside The Box’ and trying something different without the pressures of the wedding day. As you become more comfortable expanding your vision, passion and creativity without added stress, you just automatically start testing these ideas at real weddings. I would not suggest that you start all at once: developing ‘Style’ in your imagery and overall brand takes time. Don’t rush it!
Style is an overall look that your imagery evolves too. It never really attains a level you stay at. Part of being an artist is the constant evolutionary change we all seek: never satisfied, always looking for the next image-idea that turns us on. There comes a point when others look at your imagery and can detect a style of overall imagery look. In a sea of wedding photographers, that is a good thing! Model shoots can help you improve your compositions, thus improve your overall style. Practicing your craft is very important!

Composition is the rock-solid foundation of your art and business!

model-article-2.jpg

Let’s quickly give you some ideas on how to set up model shoots.You need a model, dress and location.

Models: One of the best places to find models is from your past clients! They almost never charge you for their time. They are often ready to do something cool and fun for the exchange of fresh imagery! Promising them a nice print would cost you very little and a good way to put icing on the cake when asking them to model. Dress shops often know of women looking to break into the modeling world. Often they will model for just the final imagery trade-out. You may know of a family member or friend that just wants to get out of the daily-grind and model for fun. Of course there are pro models and agencies sometimes willing to lower their prices for imagery that is different.

Dress: Ebay, discount bridle shops, past clients wedding dresses, the list is endless. Dresses can be procured with little or no cost to you. It all depends on your tenacity to ‘Make It Happen”! Dress shops will often trade out great imagery for the use of nice bridle dresses.

Location: Great locations are just a phone call away. Many places will allow you to model shoot on private property if you give them the use of the imagery shot on their location. I have always wanted to shoot at the Vizcaya Museum at Miami, Florida. The opportunity came up a few weeks ago and I will be shooting a model shoot there in less than one month! The cost for a shooting permit? $125.00 for all day. That is worth every penny to me! Yet most of my locations did not cost me a dime!

It may take a little ‘selling of a concept’ to get ingredients together for a great model shoot, yet the effort is worth your time.

There is an even easier way to be a part of model shoots if you have a little extra money but no time to organize it: Workshops.

Many workshops have bride style model shoots. This is such a great way to for the instructor to show you his/her style in action, help you with compositional concepts and allow you to take home amazing imagery that is useful in your own branding. There is nothing like learning from a photographer you admire.
model-article-3.jpg

Now that you have some amazing shots, what do you do with them?

There are endless ways to increase your brand-coverage in this industry with wonderful and artistic imagery.
Websites: my only caution would be to make clear lines to delineate what is from model shoots and what is from real weddings. A link called ‘Bride-Model Shoots’ would work. Put the images in their own link area. If your wedding images tend to be more conservative, yet you have branched out and photographed very different imagery at model shoots, don’t just mix them around your site. This can have a negative effect with brides you are used to booking. Place the more unusual styled images in there own area, together. Then the lines are drawn and the bride will probably appreciate your creativity.

Your marketing: When using images for marketing you need to find out what mood you want to evoke, what ideas you want to project, who you are, what you do and many other concepts. Bridal imagery is often hard to delineate between a real-bride and a model. I see no problem using model imagery in your marketing, as long as it is constant with the style you are capable and willing to shoot at real weddings. If you can’t replicate the model image overall style at your weddings, don’t put it front and center until you can.

If you have no problem telling a curious bride that a particular shot was actually a model image, then the bride should have no problem with it.

Let’s say you really want to shoot a destination wedding. Travel is great, but very expensive. Having a bride hire and pay your way would be a dream! If a bride does not see any destination-style work on your site, most likely she will find a photographer who does. How do you break into that market? I would suggest picking a country or destination location you have always wanted to go and create a goal to go there. Don’t just travel to see the place, make a business trip out of it: create a model shoot at your chosen location and write some of your trip off as a tax deduction. Take a model and dress with you. Perhaps your sister, friend or spouse would model for you in exchange for the airfare costs. Or arrange with people in our industry located at your travel destination to help you with a dress and model. Some will do this for trade out of your imagery. How much would it cost a dress shop to hire a commercial shooter to create art for the purpose of marketing? Plenty! Sell that idea to them. Or what if you made some photographer friends in your travel destination and arranged to ‘get together’ for an International model shoot. I have done this many times and it is a blast!!

Now take these images home and incorporate them into your marketing. If a bride asked about the images and the wedding, tell her the truth, it was a model shoot. But tell her all the effort it went into doing this and why you did it. She will most likely be impressed.

model-article-4.jpg

Here is a final yet simple concept: As your imagery becomes stronger, other photographers and brides perception of your value increases. Art is subjective, yet let me put this to the test: do an Internet search and randomly cruise through as many wedding photographers sites until you get my point: take a calculated guess at their starting package prices based on image strength and see if you are close to the mark. I will venture to say that after a while; you will see the correlation between the qualities of image/style to the perceived value of that photographer. The greater the image-composition skills, the greater the value the photographer will place on their work, thus charge more for their packages. In general, the market will not support an over-priced photographer with sub-par imagery.
How does this all tie into model shooting: The more you shoot, the stronger your imagery will become! Model shooting is a confidence builder. The more extra curricular shooting you do, the better your actual wedding shoots will become and the more your overall value will increase!

End of story!!
Not yet…

The beginning of a passion for model shoots!

model-article-5.jpg

David Beckstead is an amazing wedding photographer that shoots all over the world and is based in the Pacific Northwest. You can find more information on David and his seminars at Shoot With Beckstead.

February 7, 2008

Grand Prize Winner – Amanda Pryde!

Amanda Pryde has won the amazing RedCart system! It is a beautiful, flash-based cart system created by wedding photographer Tommy Tompkins.

Amanda Pryde

My first image (AP1.jpg) is a bridal portrait taken on the Blue Ridge Parkway right outside of Asheville, NC on November 3, 2007. The bride stood on a railing at a scenic overlook, and I shot from across the road where I’d climbed a large rock to be on the same plane as her, able to get a good deal of mountain scape and blue sky in the background. To make the finished image a panoramic, I duplicated and flipped the image in photoshop, and then merged the two images on a panoramic canvas, cloning out the bride in the second half and rearranging the mountain scape slightly to give the image a realistic panoramic appeal.

Thanks you to everyone that entered as well as RedCart and BigFolio for providing the prizes!

Older Posts »

Powered by WordPress